Imagine finishing a topic, getting your practice questions right, and then scoring 6 out of 10 on your first cementing quiz. Is the topic not yours yet, or was it just one bad quiz? Our new cementing quizzes are built to answer that question fairly, and to tell you exactly what to do next.
This article walks you through how the new cementing quizzes work, step by step. You’ll see what has changed from the old pattern, how your mastery bar is set, what happens after every quiz, and how four students moved through their modules.
This article will help you understand:
- What Cementing Is and What Has Changed
- Before Quiz 1: Three Rules That Can Cost You a Quiz
- Steps 1 to 5: From Your Warm-Up to Mastery
- When Are You Done?
- Four Students, Four Paths
- Key Takeaways
If you prefer to watch, this short video covers the same ground in under five minutes.
What Cementing Is and What Has Changed
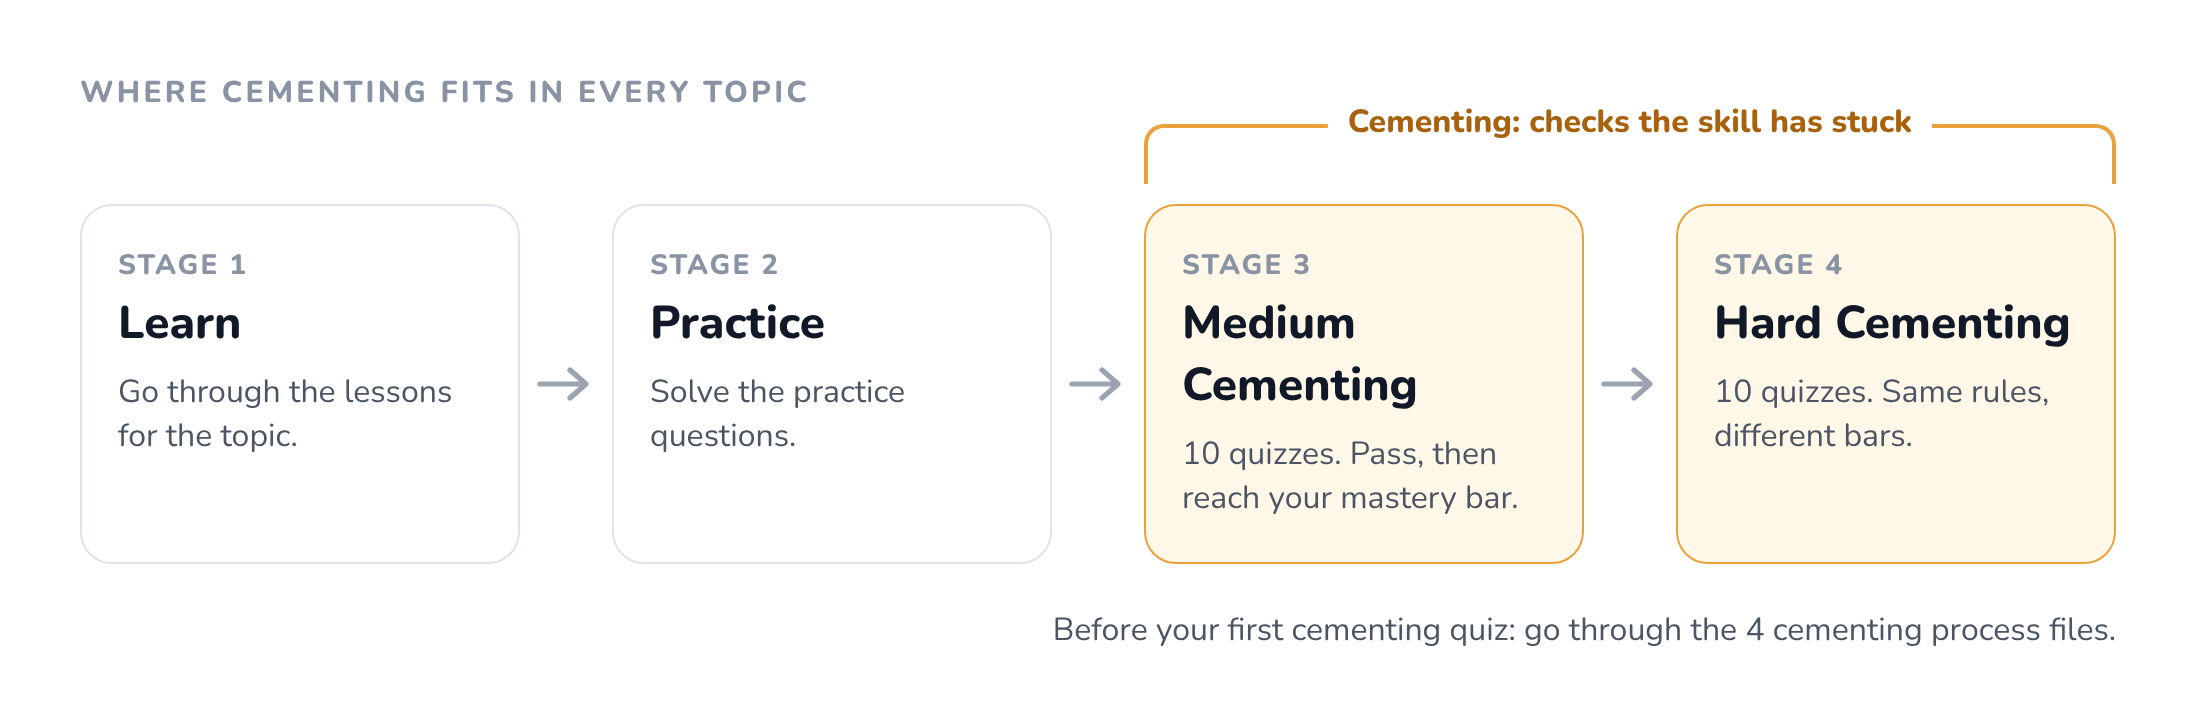
Every topic in your e-GMAT course follows the same path: you learn it, you practice it, and then you cement it. Cementing is a set of quizzes that checks whether a skill has stuck, so that you can get it right again and again, not just once. Each topic has two cementing modules, Medium first and then Hard.
What’s Different From Before
Under the old pattern, you passed Medium Cementing by scoring 70% on two quizzes in a row, and Hard Cementing by scoring 60%. That pass mark was the only bar you saw. So most students cleared it and moved on, even though the pass mark only puts you at around the 70th percentile, and their target scores needed a lot more than that.
| Old pattern | New cementing quizzes | |
| Number of quizzes | More than 10 | 10 per module |
| What you aim for | Only the pass mark: 70% in Medium, 60% in Hard | A pass mark (70% in Medium, 55% in Hard) and a mastery bar set by your target score |
| Reaching your goal | The screen only told you if you had passed | The screen tells you the moment you pass and the moment you reach mastery |
Key Insight: Passing is the minimum. Mastery is the bar that matches your target score, and that’s the one to aim for.
The rest of this article covers how you get there: a warm-up quiz, a score built from your last 2 quizzes, check-ins with a plan, and a pass that you keep once you reach it.
Before Quiz 1: Three Rules That Can Cost You a Quiz
Read these before you start. The first two can cost you a quiz for good.
- Only your first try counts. You can review a quiz or take it again, but a retake never changes your result. Your first try shows what you really know. A retake of the same questions mostly shows what you remember.
- Finish each quiz in one sitting. If you step away from a quiz for more than 10 minutes in total, that quiz is lost. It won’t count, you can’t take it again, and you have one quiz fewer out of your 10.
- Keep your quizzes close together. If more than a day passes between two quizzes, your screen flags the gap. A long break weakens cementing, so try to take your next quiz within a day.
Also go through the 4 cementing process files before your first quiz. If you press Start Quiz without reading them, the screen will suggest the files first, though it won’t stop you from starting.
Step 1: Quiz 1 Is Your Warm-Up and Doesn’t Count
Each module has 10 quizzes of 10 questions each, and every student gets the same quizzes in the same order. Quiz 1 is your warm-up. It doesn’t count toward your result, so a slow start costs you nothing. Use it to settle into the format. The screen recommends Relaxed timing for it.
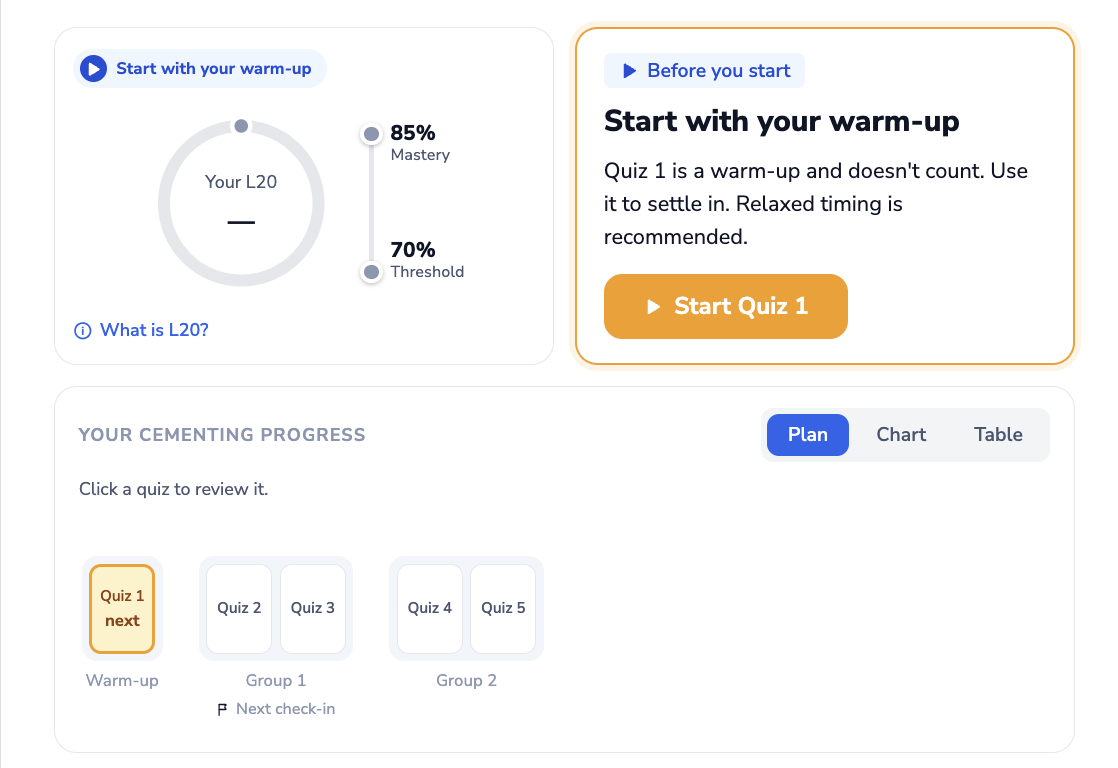
In RC and MSR, each quiz has 9 questions, three sets of three, so your L20 is out of 18 instead of 20. Each bar is rounded to whole questions, so a 70% bar becomes 13 of 18. Some older RC and MSR quizzes have between 5 and 10 questions; for those, your two quizzes are judged at the same accuracy out of their real total.
Step 2: From Quiz 3, Your Last 2 Quizzes Are Scored Together, So One Bad Quiz Can’t Sink You
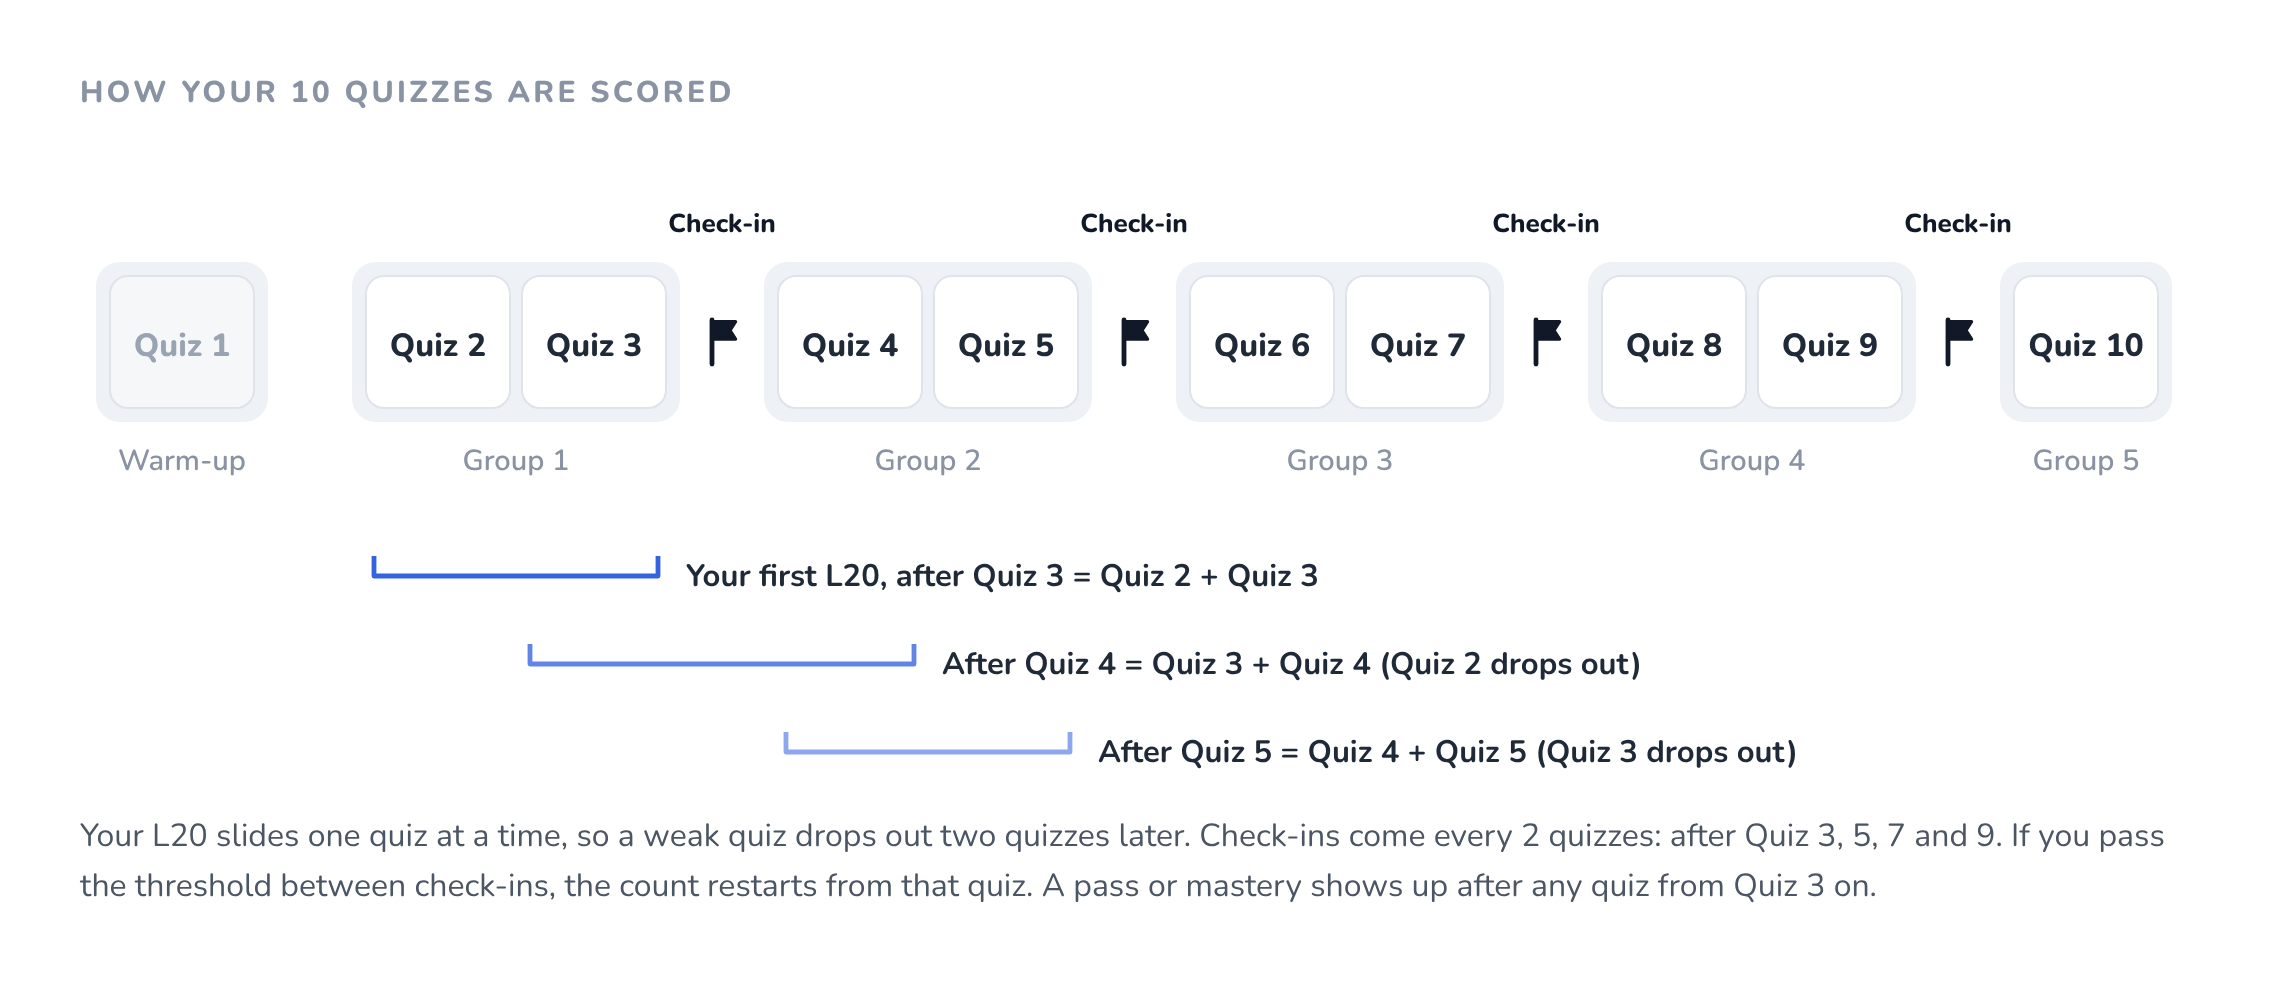
From Quiz 3 onward, we add up your correct answers across your last 2 quizzes. That gives you a score out of 20, which your screen calls your L20, short for your last 20 questions, and shows as a percentage. Your first L20 comes after Quiz 3, and it’s simply Quiz 2 plus Quiz 3.
We look at two quizzes rather than one because a single good quiz can be luck, and a single bad one can be a rough evening. Twenty questions is enough to tell the difference.
The window moves with you. After Quiz 4, your L20 is Quiz 3 plus Quiz 4, and Quiz 2 drops out. So a weak quiz stays in your L20 for two quizzes at most, and then it’s gone.
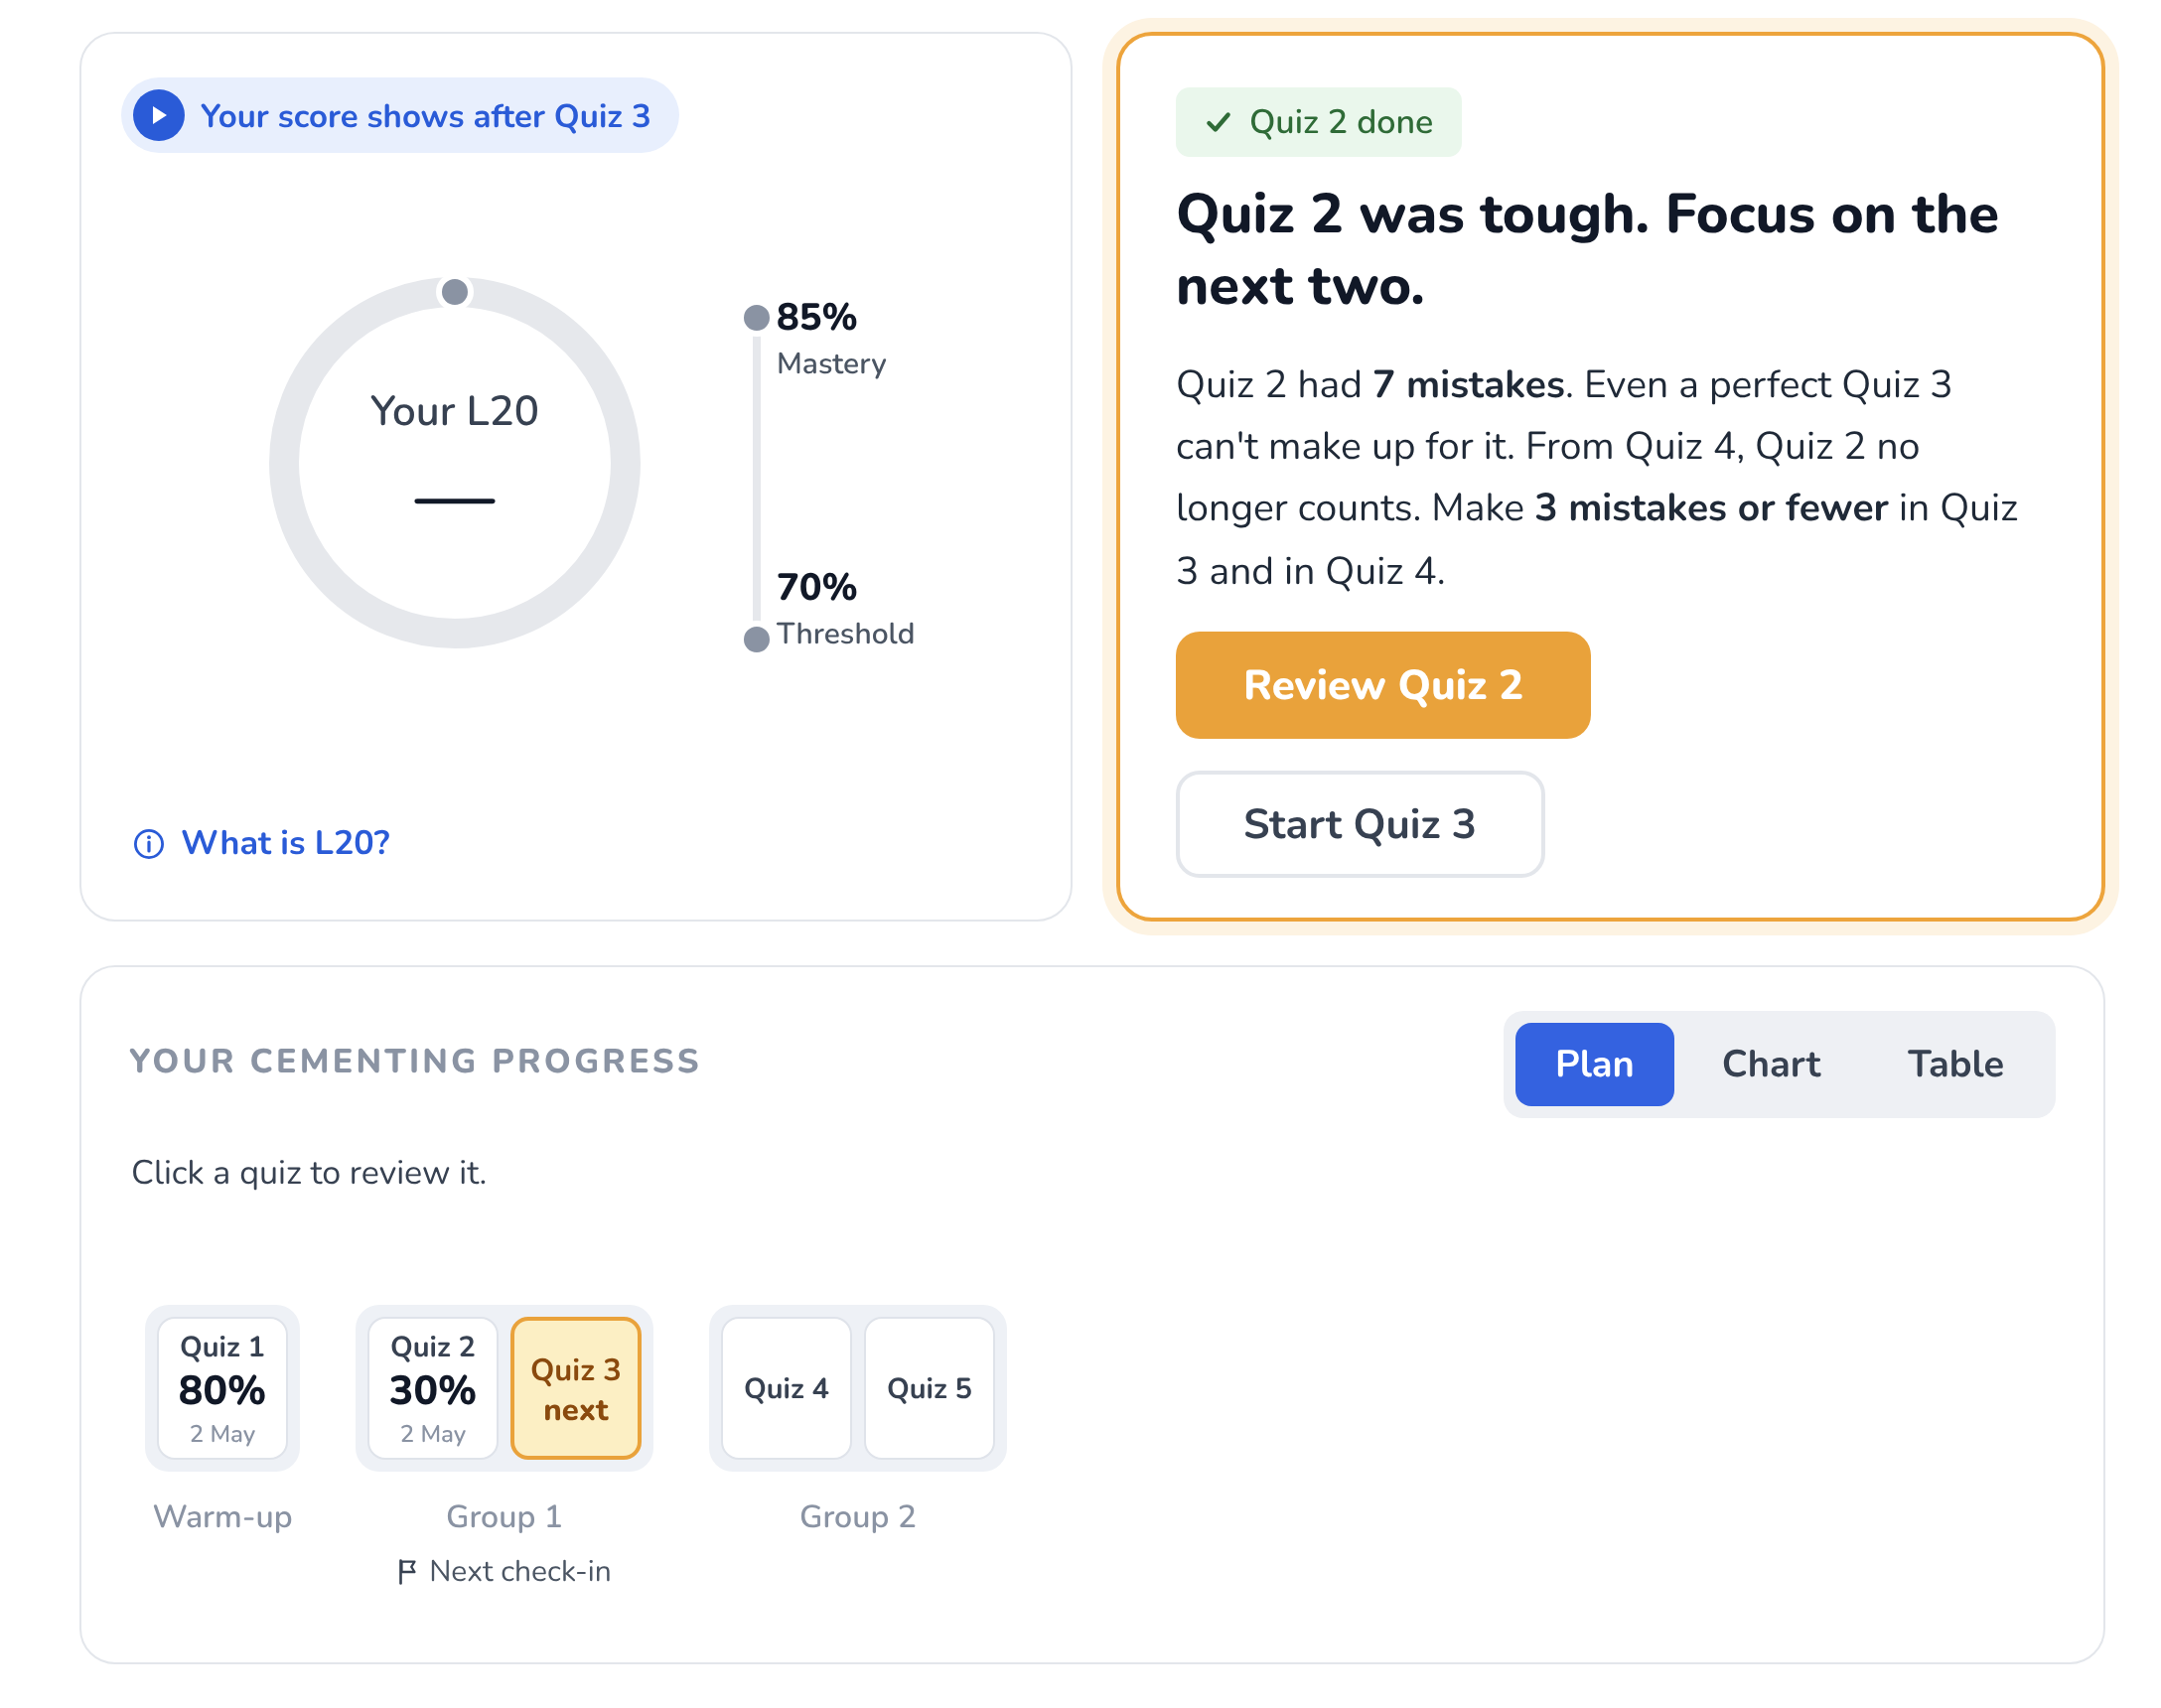
Here’s how that looks on the screen. This student made 7 mistakes on Quiz 2, so even a perfect Quiz 3 can’t lift their first L20 to the 70% threshold. The screen tells them that Quiz 2 stops counting from Quiz 4, and gives them a clear target for the next two quizzes:
Bottom Line: One weak quiz can pull your L20 down for a while, but it can’t decide your result.
Step 3: Pass With 6 Mistakes or Fewer in Medium, Then Aim for Your Mastery Bar
Every module has two bars, and you’ll see both on the level card next to your L20.
The threshold is the pass mark. It’s the same for every student:
| Module | Threshold | Correct answers needed, of 20 | Mistakes allowed across your last 2 quizzes |
| Medium Cementing | 70% | 14 | 6 |
| Hard Cementing | 55% | 11 | 9 |
The mastery bar comes from the target percentile in your Personalized Study Plan (PSP). A higher target means a higher bar. This is the bar that matters, because the threshold alone only gets you to around the 70th percentile.
| Your target percentile | Medium mastery bar | Hard mastery bar |
| Below 70 | 70%: 6 mistakes or fewer | 55%: 9 mistakes or fewer |
| 70 to 79 | 70%: 6 mistakes or fewer | 60%: 8 mistakes or fewer |
| 80 to 89 | 80%: 4 mistakes or fewer | 65%: 7 mistakes or fewer |
| 90 to 92 | 85%: 3 mistakes or fewer | 70%: 6 mistakes or fewer |
| 93 to 98 | 85%: 3 mistakes or fewer | 75%: 5 mistakes or fewer |
| 99 to 100 | 85%: 3 mistakes or fewer | 80%: 4 mistakes or fewer |
| No study plan yet | 80%: 4 mistakes or fewer | 80%: 4 mistakes or fewer |
The mistakes are counted across your last 2 quizzes. So a student targeting the 90th percentile needs 3 mistakes or fewer in Medium and 6 or fewer in Hard. If you haven’t made your PSP yet, both bars sit at 80% until you do. Making your plan first means the bar matches your goal.
Notice that the screen talks to you in mistakes, not just percentages. Before each quiz, the action box tells you how many mistakes you can afford, for example “4 mistakes or fewer”. That’s a number you can actually carry into a quiz.
Your Two Quizzes Must Also Be Even
There’s one more condition. You reach a bar only when the two quizzes in your L20 are reasonably even:
- Medium: both quizzes are at 70% or more, or the two scores are no more than 30 percentage points apart.
- Hard: both quizzes are at 55% or more, or the two scores are no more than 20 percentage points apart.
Let me show you with an example. Say your Hard mastery bar is 70%, and you score 100% on one quiz and 40% on the next. Your L20 is 14 out of 20, exactly 70%. But 40% is below 55%, and the two scores are 60 points apart, so the bar isn’t reached yet. You need one more quiz to replace the 40%.
In other words, one great quiz can’t carry a weak one. The bar is reached when both quizzes show the skill.
Step 4: Once You Pass, Your Pass Is Locked and You Keep Going for Mastery
The moment your L20 reaches the threshold, the screen tells you. This can happen after any quiz from Quiz 3 on, so you never have to wait for a check-in to get good news. Your plan view marks the moment with a star and the words “Going for mastery”.
From here, you simply keep taking quizzes. There’s nothing to press and no decision to make. Every quiz after a pass is a step toward your mastery bar.
Your pass is locked. If your L20 later drops below the threshold, you stay passed, because you’ve already shown the skill over 2 quizzes. The same holds for mastery. That’s what makes it safe to keep pushing for the higher bar.
When your L20 reaches your mastery bar, the module is marked done for you, again straight away. After that, you can take any unused quizzes as practice. They update your chart, but they can’t change your status.
Step 5: Not There Yet? Each Check-in Gives You a Fix-It Plan and a Target in Mistakes
A “not yet” only ever comes at a check-in. Your first check-in is after Quiz 3. After that, a check-in comes every 2 quizzes, so after Quiz 5, Quiz 7 and Quiz 9. If you pass the threshold between check-ins, the count restarts from that quiz. For example, if you pass on Quiz 4, your next check-in is after Quiz 6.
This timing means a “not yet” is always based on 2 fresh quizzes, taken after your last check-in or your pass. An older quiz can help you pass, but it can never count against you. Between check-ins, you get room to work on your mistakes.
At each check-in, you get a plan called the Loop. It has four steps:
- Locate your weak area by going through your mistakes.
- Overcome it by fixing those mistakes.
- Own the fix, so you get it right the next time too.
- Prove it on your next cementing quiz.
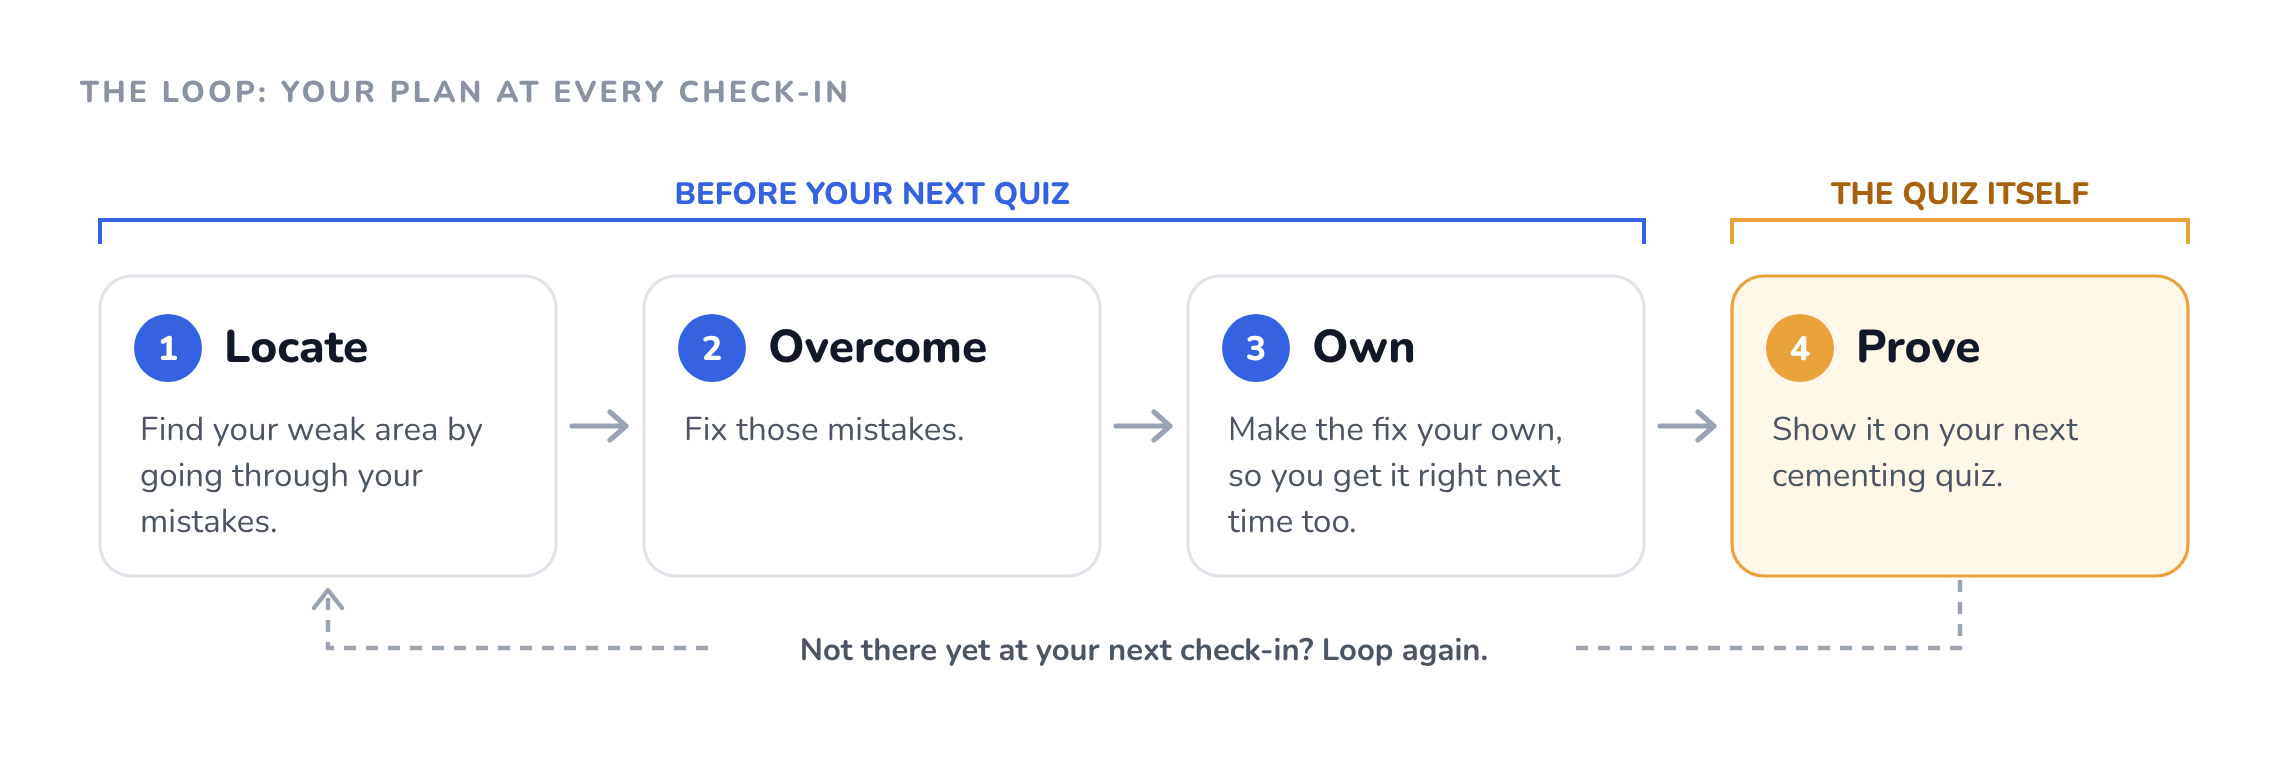
The first three steps happen before your next quiz, and the fourth step is the quiz itself. The check-in also gives you a target for that quiz in mistakes, such as “Quiz 7: 1 mistake or fewer.” In your plan view, each check-in shows up as a flag.
When Are You Done? Usually Before Quiz 10
Most students finish a module before Quiz 10. You can be done as early as Quiz 3, if your very first L20 reaches your mastery bar.
A module ends in one of two ways:
- You reach your mastery bar. The module is marked done the moment it happens, and the screen points you to what’s next, such as Hard Cementing once you finish Medium.
- You use all 10 quizzes. The module closes by itself at the best level you reached. If you passed, it closes as “Done · Threshold met”. If you didn’t, it closes as “Done · Threshold not met”.
Medium First, Then Hard
Do Medium Cementing first, then Hard Cementing. Hard works exactly the same way; only the bars change.
Hard is never locked, though. If you haven’t passed Medium yet, Hard shows a warning. That warning softens if you score 6 or more out of 10 on Hard’s warm-up. And if you pass Hard, Medium is marked “Medium not needed”, so you can skip it.
Four Students, Four Paths
The same rules can play out very differently. Here are four students and how their modules went.
Neha: Hard Number Properties in 3 Quizzes → Medium Not Needed
Neha’s study plan targets the 80th to 89th percentile, so her Hard mastery bar was 65%.
| Quiz | Score | L20 | What happened |
| Quiz 1 | 100% | – | Warm-up |
| Quiz 2 | 90% | – | First quiz that counts |
| Quiz 3 | 90% | 90% | Mastery reached. Module done. |
Walk through it with me. Her first L20, Quiz 2 plus Quiz 3, came to 18 out of 20. That’s 90%, well above her 65% bar, so the module was marked done on the spot. Because she passed Hard, Medium Cementing was marked “not needed”. She can still take Medium quizzes as practice if she wants to.
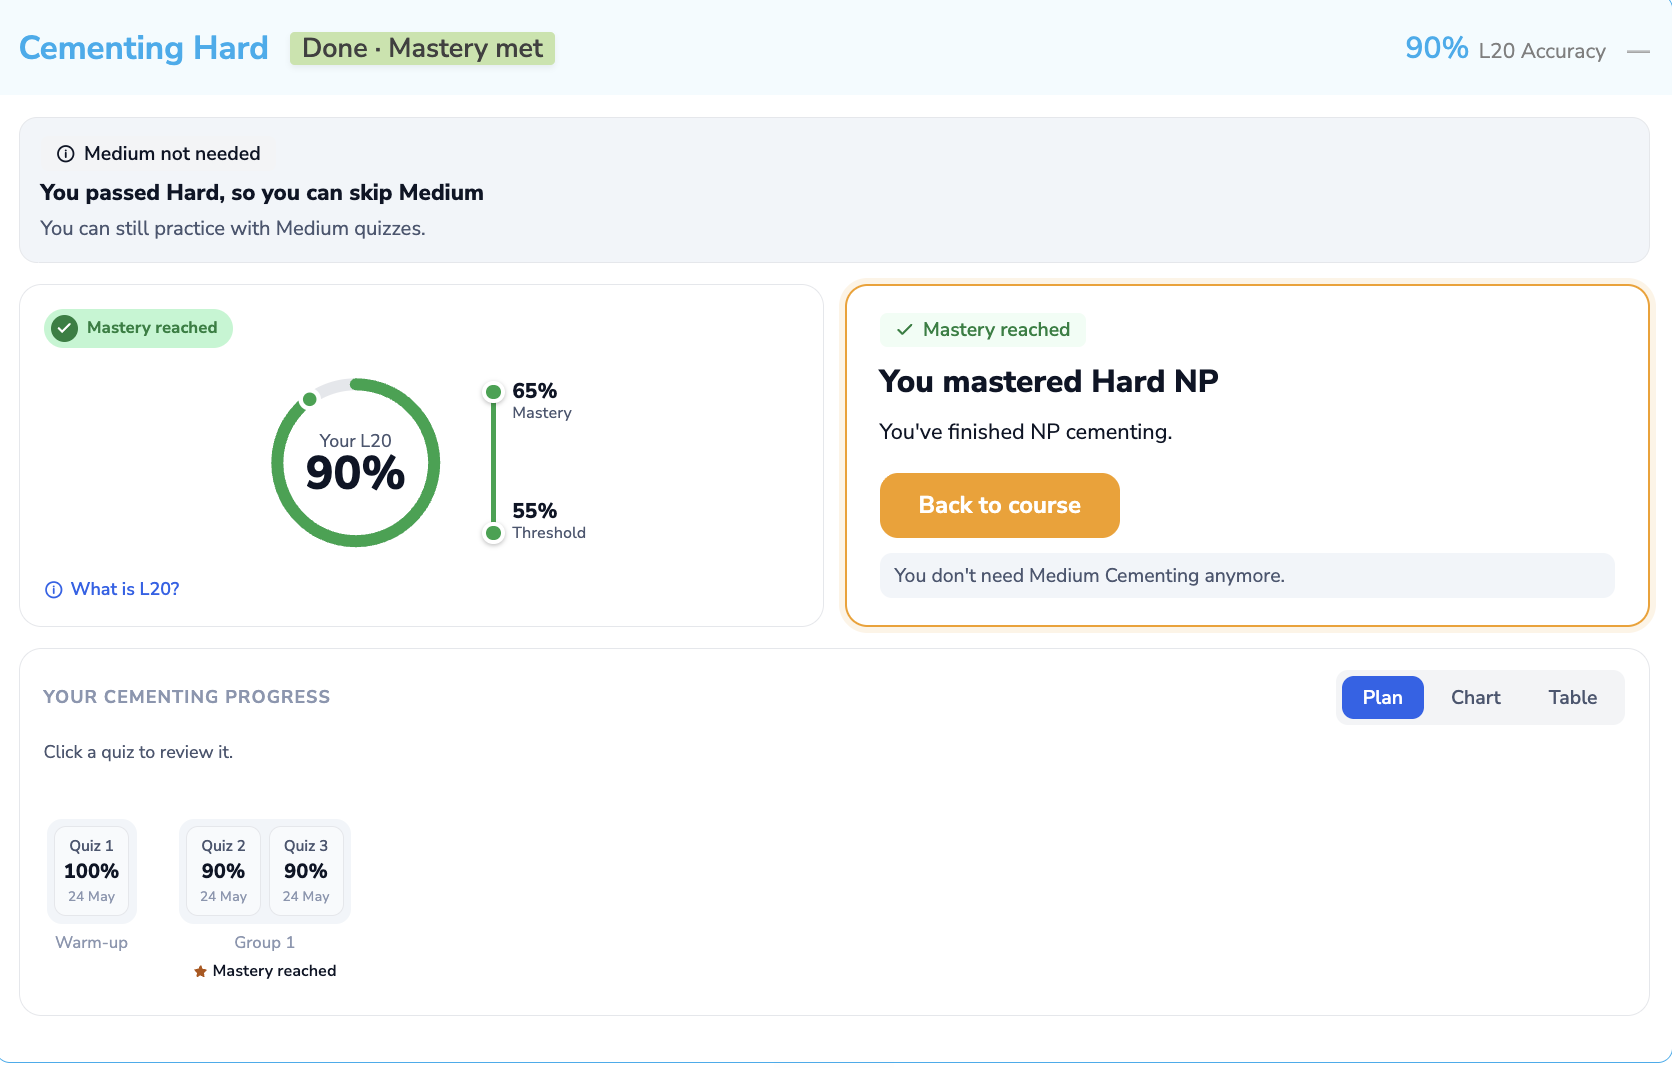
Key Insight: You don’t have to use all 10 quizzes. If a skill is already solid, cementing can confirm it in three.
Aditya: Medium Critical Reasoning → Passed on Quiz 3, Mastered on Quiz 4
Aditya’s study plan targets the 90th percentile or higher, so his Medium mastery bar was 85%. That meant 3 mistakes or fewer across his last 2 quizzes.
| Quiz | Score | L20 | What happened |
| Quiz 1 | 80% | – | Warm-up |
| Quiz 2 | 80% | – | |
| Quiz 3 | 80% | 80% | Threshold met. Going for mastery. |
| Quiz 4 | 100% | 90% | Mastery reached. Module done. |
After Quiz 3, his L20 was 80%: comfortably past the 70% threshold, but one mistake short of his bar. So he kept going. A perfect Quiz 4 lifted his L20 to 90%, and the screen moved him on to Hard Cementing.
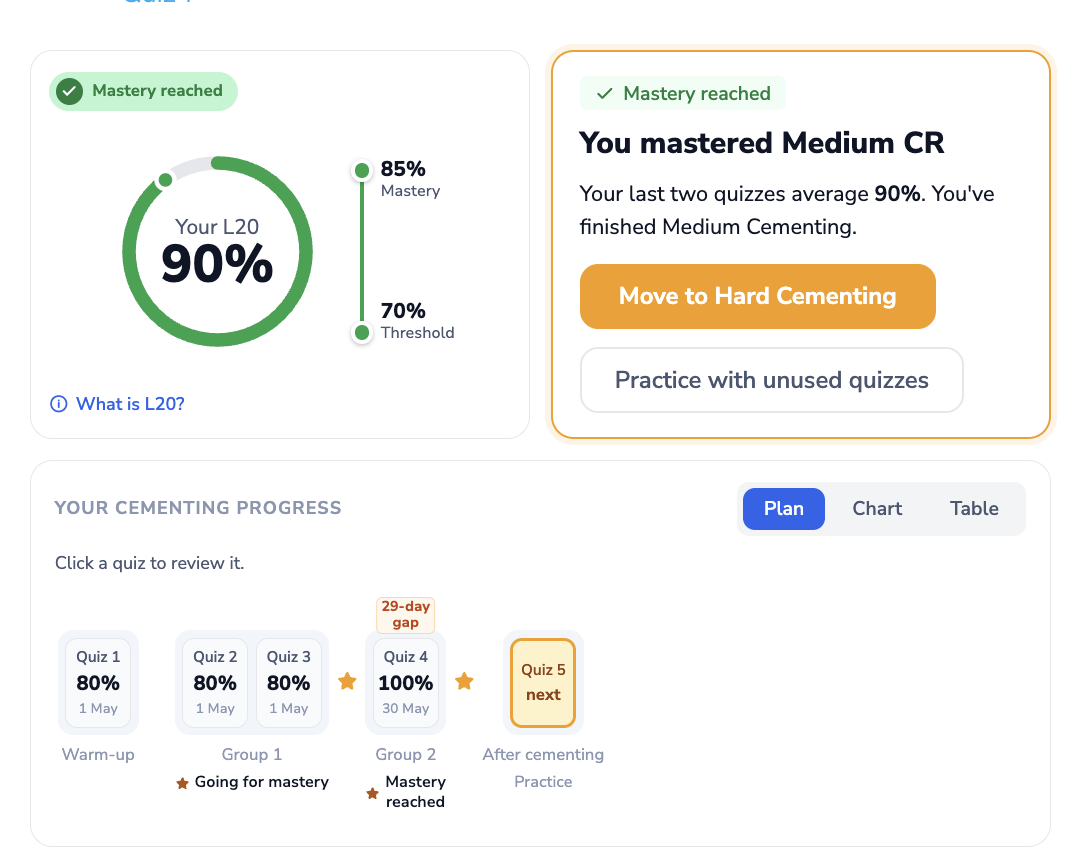
Here’s the catch: look at the dates. Aditya took Quiz 4 a full 29 days after Quiz 3, and the screen flagged the gap. It worked out for him, but long breaks weaken cementing, so try not to copy that part.
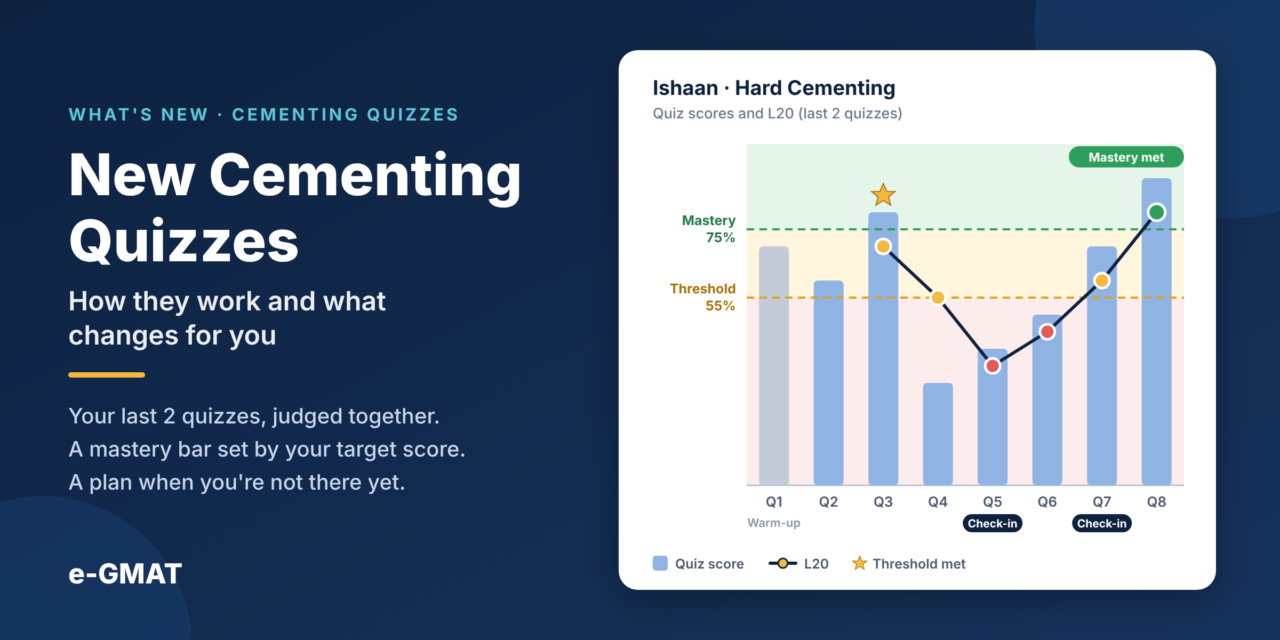
Ishaan: Hard Cementing → Passed Early, Hit a Rough Patch, Mastered on Quiz 8
Ishaan’s study plan targets the 93rd to 98th percentile, so his Hard mastery bar was 75%.
| Quiz | Score | L20 | What happened |
| Quiz 1 | 70% | – | Warm-up |
| Quiz 2 | 60% | – | |
| Quiz 3 | 80% | 70% | Threshold met. Going for mastery. |
| Quiz 4 | 30% | 55% | |
| Quiz 5 | 40% | 35% | Check-in. Applied the Loop. |
| Quiz 6 | 50% | 45% | |
| Quiz 7 | 70% | 60% | Check-in. Applied the Loop. |
| Quiz 8 | 90% | 80% | Mastery reached. Module done. |
| Quiz 9 | 70% | 80% | Practice. Keeps mastery. |
Walk through it with me. Ishaan passed the threshold on Quiz 3. Then he scored 30% and 40% on his next two quizzes, which took his L20 down to 35%, well below the threshold. His pass stayed anyway, because once you reach a level, you keep it.
At each check-in he worked through the Loop, and his L20 climbed from 35% to 60%. Then he scored 90% on Quiz 8. That made his last two quizzes 70% and 90%, an L20 of 80%, past his 75% bar. The screen told him straight away, without waiting for the next check-in.
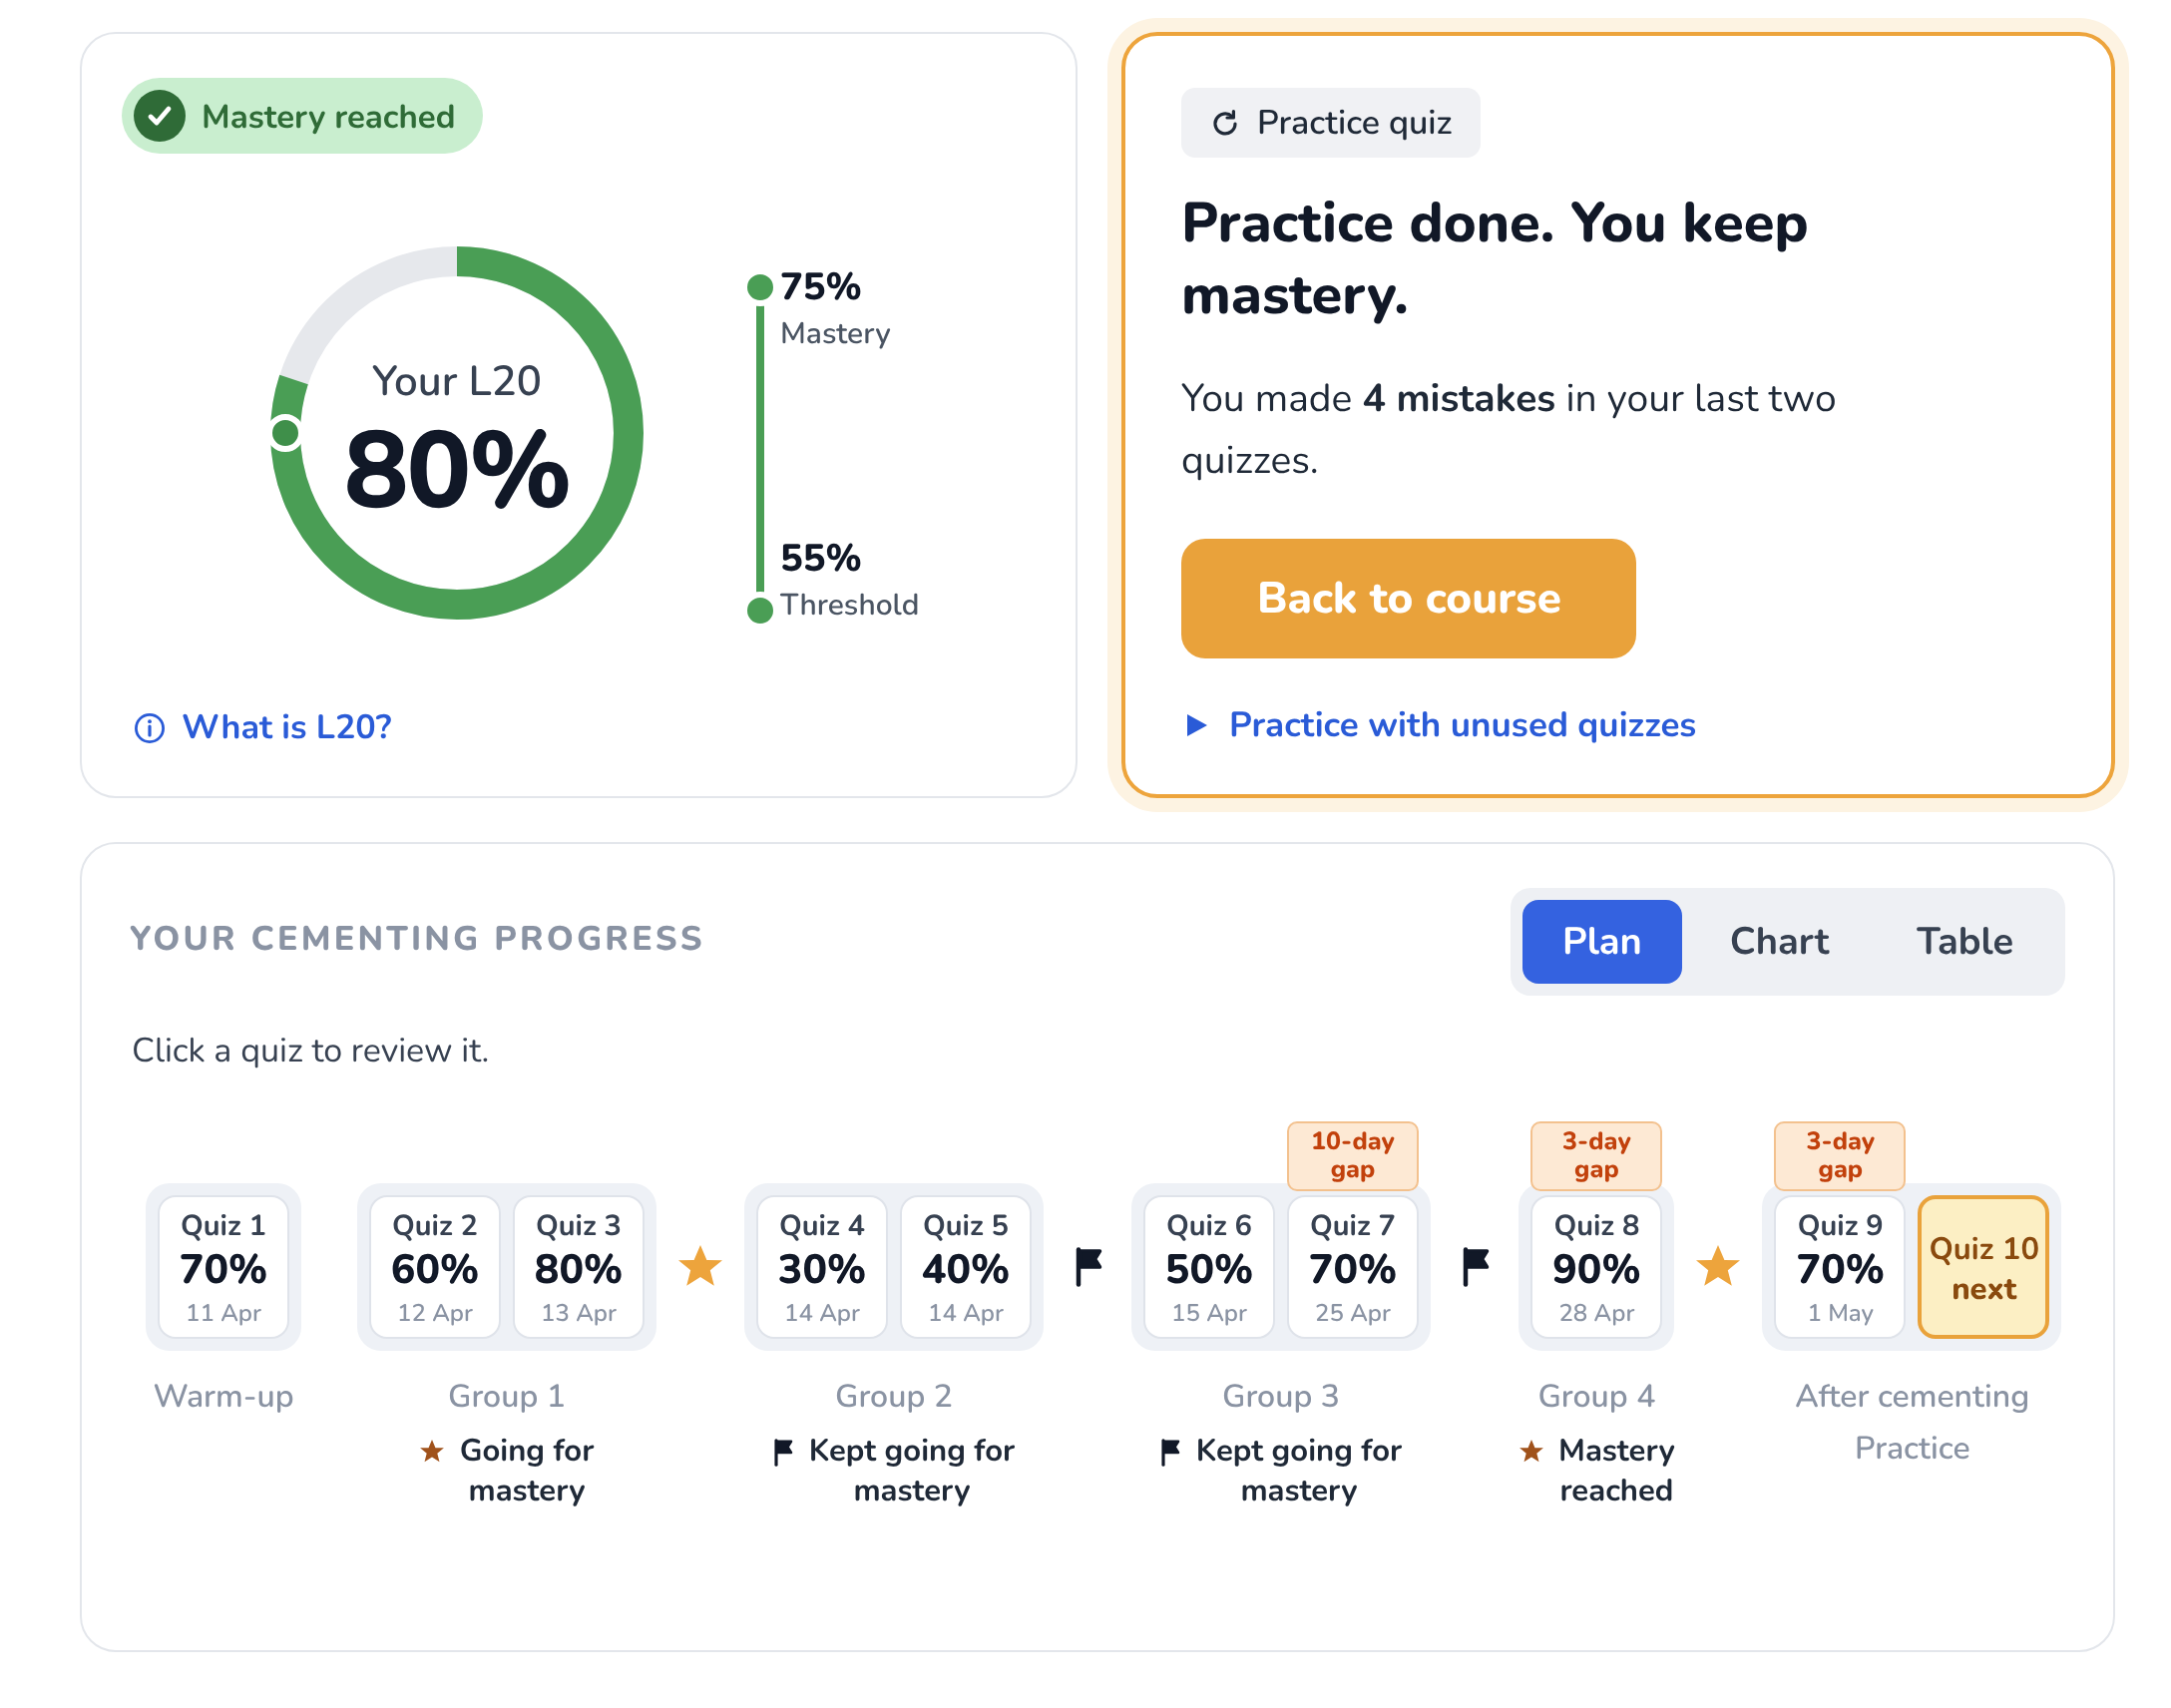
Bottom Line: A slow stretch doesn’t cost you your pass, and good news never waits for a check-in.
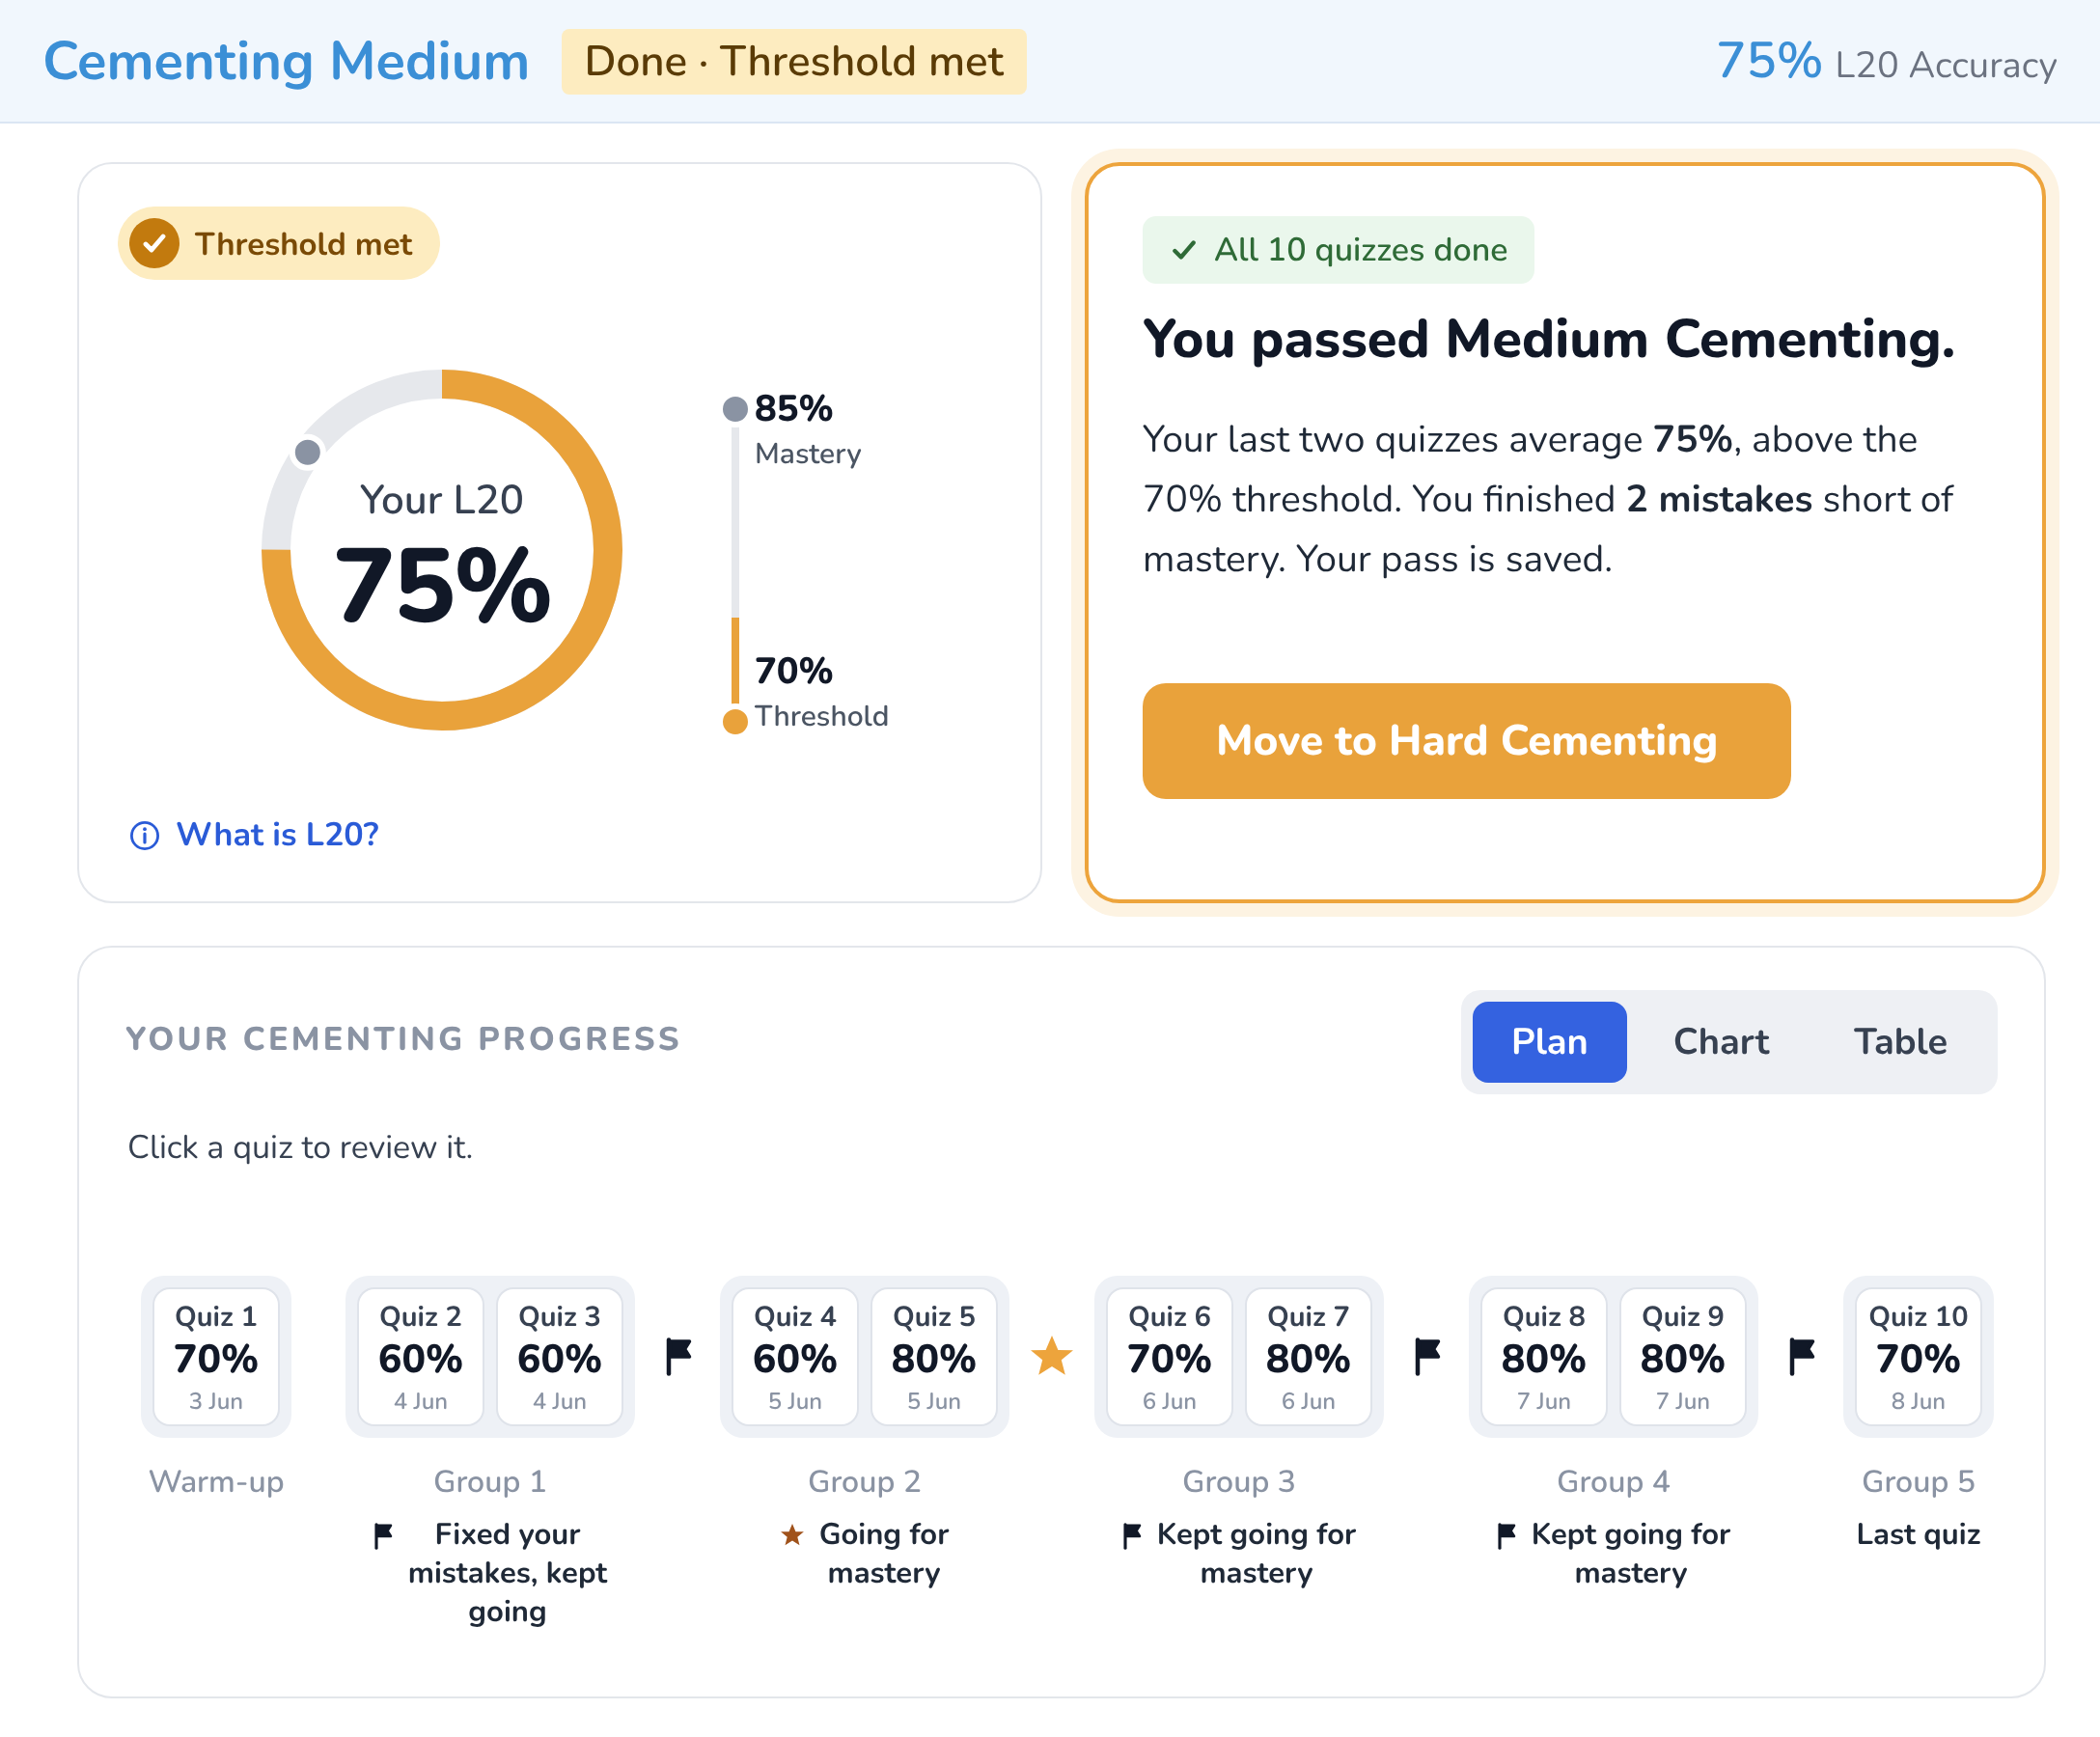
Kabir: Quizzes Run Out → Module Closes at His Best Level
Kabir’s study plan targets the 95th percentile, so his Medium mastery bar was 85%: 17 out of 20, or 3 mistakes across his last 2 quizzes. He passed the threshold on Quiz 5, then stayed at 15 or 16 out of 20 for the rest of the module. Each check-in gave him the Loop and a target, but by Quiz 10 he hadn’t reached 17.
| Quiz | Score | L20 | What happened |
| Quiz 1 | 70% | – | Warm-up |
| Quiz 2 | 60% | – | |
| Quiz 3 | 60% | 60% | Check-in. Applied the Loop. |
| Quiz 4 | 60% | 60% | |
| Quiz 5 | 80% | 70% | Threshold met. Going for mastery. |
| Quiz 6 | 70% | 75% | |
| Quiz 7 | 80% | 75% | Check-in. Applied the Loop. |
| Quiz 8 | 80% | 80% | |
| Quiz 9 | 80% | 80% | Check-in. Applied the Loop. |
| Quiz 10 | 70% | 75% | Last quiz. Module closes at Done · Threshold met. |
When his quizzes ran out, the module closed at his best level: “Done · Threshold met”. His pass stayed with him throughout. If you find yourself in Kabir’s position around Quiz 7 or 8, follow your check-in targets closely. Each one tells you exactly how many mistakes stand between you and mastery.
Conclusion
The new cementing quizzes judge you on your last 2 quizzes, tell you the moment you pass or reach mastery, and give you a plan whenever you’re not there yet. Most importantly, they show you a mastery bar that matches your target score, so clearing the pass mark is no longer mistaken for being done.
Key takeaways:
- Each module has 10 quizzes. Quiz 1 is a warm-up and doesn’t count.
- From Quiz 3, your L20 is your correct answers across your last 2 quizzes.
- The threshold is 70% in Medium and 55% in Hard. Your mastery bar comes from the target percentile in your study plan, and that’s the one to aim for. A bar is reached only when both quizzes in your L20 are even.
- A pass or mastery shows up after any quiz, and once you reach a level, you keep it.
- A “not yet” comes only at a check-in, with the Loop and a target for your next quiz in mistakes.
- Only your first try counts, and stepping away from a quiz for more than 10 minutes loses it.
- Most students finish before Quiz 10.
Ready to start? Open your Medium Cementing module, go through the 4 cementing process files, and take Quiz 1.